Kapow - Making a Game in Real-Mode x86 Assembly
Table of Contents
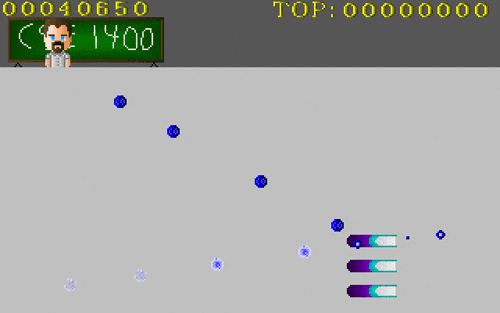
Kapow is a remake of Kaboom! (1981) for the Atari 2600. It runs on an x86 machine without an operating system, exclusively in 16 bit real-mode. I made it as a bonus assignment for CSE1400 at TU Delft. The source code is available at Github.
Why Real-Mode Assembly?
The assignment called for a simple game in assembly. Most students wrote Linux CLI programs in x86. I decided to go a bit further and write something that would boot directly from disk, no operating system required. This meant working in Real Mode—the state your CPU enters on startup, where it behaves like a 1978 Intel 8086 with a much higher clock speed. Sixteen bit registers, one megabyte of RAM, and none of the conveniences of a modern operating system.
Was this a good idea? Probably not. Was it educational? Absolutely.
The Hard Parts
Working in real-mode with a modern assembler presented some unexpected challenges. NASM is designed for 32 and 64 bit code, and its 16 bit support has some rough edges.
The Addressing Problem
You might notice that in Real Mode we have access to a whole megabyte of RAM, but we are using 16 bit registers to address it. How is it possible to address one million bytes, if in 16 bits we can only represent 64 thousand distinct values? The answer lies in Memory Segmentation—another register provides an additional 4 bits for addressing, giving us 20 bits total. Every 64 kilobytes of RAM is referred to as one segment.
The main problem with using NASM in 16 bit code starts when you try to modify the value at a label:
var: dw 0x123
mov ax, [var]
mul 20
mov [var], ax
Normally, you would expect this to work. However, when dealing with 16 bit code NASM refuses to do this. Upon further digging, it seemed possible to use seg to load the segment of the label, but this requires Microsoft COM files. In order to preserve the debugging advantages of using a modern ELF format, I had to find another solution.
Bootlegged Effective Addressing
The workaround was to define an area in memory where variables would be stored. This was done in game/var_locs.asm. A base offset is defined (0xC000), and subsequently the location of every single variable used by the game is defined manually. This also necessitates the initialization of each memory location in the respective file where the variables are used.
The same approach applies to sprites. The easiest solution would be:
sprite: incbin "./mysprite.bin"
mov ax, seg sprite
mov es, ax
mov ax, sprite
call my_draw_routine
But due to the aforementioned problems, this is not possible. Instead, sprite locations are stored in game/sprite_constants.asm, and the sprites themselves are loaded into a separate segment. To make this work, the code segment is padded to exactly 64 kilobytes:
times 0xFFFF - ($-$$) db 0
This way we know exactly where the sprites will be—in the next segment after the code.
The Toolchain
Graphics: Mode 13h
In the late 80's and early 90's, the most common graphics hardware on a PC was the VGA Chip. To this day, practically every GPU implements its functionality. The most popular mode was Mode 13h, and it is trivial to set up:
mov ax, 0x13
int 0x10
Mode 13h gets its name from the value put into =ax=—13 hexadecimal.
Drawing to the Screen
Once set, the screen can be written to as a linear buffer at segment 0xA0000. The screen is 320x200 pixels, taking up an entire 64 kilobyte segment. Each byte represents a single pixel, with the value being an index into the color palette.
Since this is a linear framebuffer, drawing a pixel at coordinates (x, y) is straightforward:
offset = x + y * 320
A simple pixel-drawing function:
; Draws a pixel on the screen
; al - color
; bx - x-coordinate
; cx - y-coordinate
put_pixel:
        push bp
        mov bp, sp

        push ax
        mov ax, 320
        mul cx
        add bx, ax
        pop ax

        mov dx, 0xA000
        mov gs, dx
        mov [gs:bx], al

        mov sp, bp
        pop bp
        ret
The Palette
With one byte per pixel, we only have 256 possible values. If we used direct RGB, we would have around 2.5 bits per component—not great for artwork. Instead, Mode 13h uses indexed color: each byte is an index into a 256-entry palette, where each entry specifies an RGB color.
Setting a palette entry involves direct communication with the VGA card:
; Sets an index in a palette to a color
; ah - index
; bl - red (0-63)
; bh - green (0-63)
; cl - blue (0-63)
set_palette_index:
        push bp
        mov bp, sp

        mov al, 0xFF
        mov dx, 0x3C6           ; PEL Mask Register
        out dx, al

        mov al, ah
        mov dx, 0x3C8           ; PEL Address Write Mode Register
        out dx, al

        mov dx, 0x3C9           ; PEL Data Register
        mov al, bl
        out dx, al
        mov al, bh
        out dx, al
        mov al, cl
        out dx, al

        mov sp, bp
        pop bp
        ret
The VGA card only uses the lower 6 bits of each color component, hence values 0-63.
VSync and Double Buffering
Writing directly to the framebuffer with moving elements causes severe screen tearing. The solution is double buffering: write to a separate memory segment (0x70000), then copy to the framebuffer during the vertical blank period.
Before copying, we wait for the right moment:
vt_set:
        in al, dx
        and al, 8
        jnz vt_set

vt_clr:
        in al, dx
        and al, 8
        jz vt_clr
Then copy the entire buffer:
copy_buffer:
        push bp
        mov bp, sp

        mov cx, 0x7000
        mov ds, cx
        xor si, si             ;ds:si = source

        mov cx, 0xa000
        mov es, cx
        xor di, di             ;es:di = destination

        mov cx, 32000          ;32k words to fill the screen
        mov dx, 0x3da          ; VGA status register

        rep movsw

        mov sp, bp
        pop bp
        ret
The Asset Pipeline Problem
Sprite creation is normally straightforward: draw in GIMP, export, load. But Mode 13h has some complications:
- No libraries means writing your own image format parsers.
- 256 indexed colors is not trivial to work with in modern tools.
- Mode 13h does not have square pixels. 320x200 is stretched to 4:3 aspect ratio. What you see in GIMP is not what appears on screen.
The solution was to use Deluxe Paint, a sprite editor from the early 90's that runs in Mode 13h itself. The pixels display correctly, and the program is specifically designed for this graphics mode.
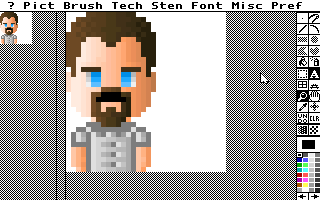
There is still a problem: the most modern format Deluxe Paint supports is PCX.
PCX → BMP → Binary
PCX is RLE encoded, which is annoying to decompress. The Makefile uses ImageMagick to convert to uncompressed BMP:
convert -compress none assets/$(1).PCX out/assets/$(1).bmp
BMP is simpler, but still has issues: it contains header and palette data we do not need, and pixels are stored bottom-to-top. A small C program (src/assets/conv_asset.c) converts BMP to raw binary with top-to-bottom pixel order:
struct BMPHeader head;
fread(&head, sizeof(head), 1, source);
skip_bytes(head.offset-sizeof(head), source);

char out[height][width];

// Read bottom-to-top (BMP format)
for(int i = height-1; i >= 0; i--){
  for(int z = 0; z < width; z++){
    out[i][z] = fgetc(source);
  }
}

// Write top-to-bottom (our format)
for(int i = 0; i < height; i++){
  for(int z = 0; z < width; z++){
    fputc(out[i][z], output);
  }
}
Finally, the binary files are concatenated onto the disk image:
cat out/assets/$(1).bin >> out/HD.img
The Bootloader
When making a bootable program, the Bootloader is the first code to run. The BIOS loads the first 512 bytes from the storage device into memory at 0x7c00, then jumps to it.
Kapow's bootloader (bootup/booter.asm) does the following:
- Load the game code from disk into memory:
mov ax, game_start
mov es, ax              ; segment address to copy to
mov ah, 0x2             ; read sectors from drive
mov al, 128             ; amount of sectors to read
mov ch, 0               ; cylinder
mov dh, 0               ; head
mov cl, 2               ; sector
mov dl, 0x80            ; disk
mov bx, 0               ; address to copy to
int 0x13
- Set up the timer using the PIT to fire approximately 100 times per second:
mov al,00110100b          ;channel 0, lobyte/hibyte, rate generator
out 0x43, al

mov ax,PIT0_reload        ;ax = 16 bit reload value
out 0x40,al               ;Set low byte of PIT reload value
mov al,ah
out 0x40,al               ;Set high byte of PIT reload value
- Hook the timer interrupt by writing to the IVT. This makes the game loop run on every timer tick:
mov ax, game_start
mov [cs:0x1c*4+2], ax   ; move segment of game to IVT
mov ax, game_tirq
mov [cs:0x1c*4], ax     ; move address of irq to IVT
Animations
The only real animation in Kapow is bomb explosions, of which there can be many on screen simultaneously. They are stored in a circular queue.
The Data Structure
Each explosion has a position and an animation state (a fixed-point integer representing the current frame):
%define explosion_state bomb_y+2*number_of_bombs
%define explosion_x explosion_state+2*number_of_explosions
%define explosion_y explosion_x+2*number_of_explosions
%define explosion_start_index explosion_y+2*number_of_explosions
%define explosion_end_index explosion_start_index+1
Creating an Explosion
When a bomb explodes, we add it to the queue. If the queue is full, the explosion is simply dropped:
; Starts an explosion animation where a bomb is
; ax - bomb index
explode_bomb:
        push bp
        mov bp, sp
        push si
        push di
        push bx

        mov si, ax

        xor bx, bx
        mov bl, [cs:explosion_end_index]
        push bx
        inc bl
        mov ax, 0
        cmp bl, number_of_explosions
        cmove bx, ax
        cmp bl, [cs:explosion_start_index]
        pop bx
        je expb_e

        mov di, bx
        inc byte [cs:explosion_end_index]

        cmp di, number_of_explosions-1
        jne expb_c
        mov byte [cs:explosion_end_index], 0

expb_c:
        shl di, 1
        shl si, 1
        mov ax, [cs:bomb_x+si]
        mov [cs:explosion_x+di], ax
        mov ax, [cs:bomb_y+si]
        mov [cs:explosion_y+di], ax
        mov word [cs:explosion_state+di], 0

expb_e:
        pop bx
        pop di
        pop si
        mov sp, bp
        pop bp
        ret
Updating and Rendering
Each tick, explosions advance through their frames. When an explosion completes, it is removed from the queue. The rendering code iterates through the queue and draws each explosion at the correct frame:
render_explosions:
        push bp
        mov bp, sp

        xor ax, ax
        mov al, [cs:explosion_start_index]
        xor di, di
        mov di, ax

        xor cx, cx
        mov cl, [cs:explosion_end_index]

r_ex_l:
        cmp di, cx
        je r_ex_e

        push cx
        push di

        shl di, 1

        mov dx, bomb_width*bomb_height
        mov ax, [cs:explosion_state+di]
        shr ax, 8
        mul dx
        mov dx, expls_loc
        add dx, ax

        mov ax, [cs:explosion_y+di]
        shr ax, 4
        mov bx, [cs:explosion_x+di]
        mov ch, bomb_width
        mov cl, bomb_height
        call draw_sprite

        pop di
        pop cx

        inc di
        cmp di, number_of_explosions
        jne r_ex_l
        mov di, 0
        jmp r_ex_l

r_ex_e:
        mov sp, bp
        pop bp
        ret
What I Learned
Writing a game without an operating system teaches you what operating systems actually do for you. Memory management, file loading, graphics drivers, input handling—all of it has to be built from scratch.
The biggest surprise was the tooling problems. Modern assemblers assume modern environments. Working around NASM's 16-bit limitations took more time than expected.
Would I do it again? For a university bonus assignment, probably not. But it was a good way to understand what happens between pressing the power button and seeing something on screen.
At the end of the course there was a competition where everyone voted on each other's games. Kapow won by popular vote, so I suppose the extra effort paid off.
The source code is at Github.